STEP 2 : ���ȡ���Τ���ν���
|
�� ���ߡ�ư���Ƥ��� FlexNet �饤���ޥ͡����� ����ߤ���
����(�С�����åפξ��Τ߹Ԥ��� |
|
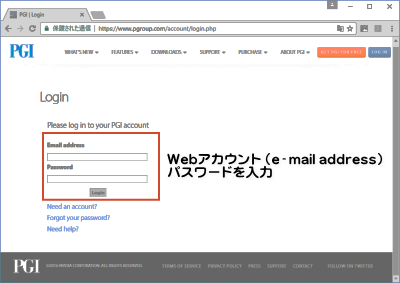
�������ϡ���FlexNet �����פǤ����Ѥξ��Τ�ΤǤ���
�롼�ȸ��¤ǥ����������Ƥ���������FlexNet �饤���ޥ͡�����ε�ư����ߥ�����ץ� lmgrd-pgi��or lmgrd) ����Ѥ��ơ��ʲ��Υ��ޥ�ɤǥޥ͡��������ߤ��ޤ������θ塢FlexNet
�饤���ޥ͡����� (lmgrd) ������åȥ����줿�ȸ�����å��������ǧ���ޤ����ʤ����ޥ͡����������ˤ����Ƥϡ�����ư��Ƥ���饤�����ե������license.dat)
����Ѥ��ޤ��Τǡ��ޥ͡��������ߤ������ˡ��������饤���ˤ�� license.dat �ι����ϹԤ�ʤ��Ǥ���������
|
# /etc/init.d/lmgrd-pgi stop
�⤷��lmgrd-pgi �ȸ����ե����뤬¸�ߤ��ʤ���硢lmgrd ���뤤�ϡ�
lmgrd.rc �ȸ���̾�Τ���Ͽ����Ƥ����ǽ��������ޤ���
���ξ��ϡ�ls ���ޥ�ɤ� lmgrd ��¸�ߤ��뤳�Ȥ��ǧ����
�ʲ��Τ褦�ˤ��Ƥ���������
# /etc/init.d/lmgrd stop
|
|
�����ա�
�⤷���嵭�� "lmgrd-pgi" ���뤤�ϡ�"lmgrd"��"lmgrd.rc"
��¸�ߤ��ʤ����ϡ��֥����ƥ൯ư���ˤ�����饤���ޥ͡�����μ�ưΩ���夲������פ��Ԥ��Ƥ��ʤ���ǽ��������ޤ������ξ��ϡ��ʲ��Υ��ޥ�ɤ���Ѥ��ơ��饤���ޥ͡��������ߤ�ԤäƤ����������ʤ����ʲ��Υѥ��ϡ����ߡ�ư��Ƥ��륳��ѥ���ΥС������� 2017 �Ȥ������Τ�Τ����ꤷ����ΤǤ���Ŭ��������ư��Ƥ���С�������ֹ���ѹ����Ƥ���������
����$ /opt/pgi/linux86-64/2017/bin/lmgrd.rc stop (64-bit Linux ���
|
�� ���ߤΥ饤���ΥХå����åפ���
����(�С�����åפξ��Τ߹Ԥ��� |
|
���ߤ� PGI ���եȥ����������ȡ��뤵��Ƥ�����ʥǥե���Ȥ� /opt/pgi) �˰�ư���� license.dat ��¸�ߤ��ǧ���Ƥ�����������С������ΤޤĤ���/opt
���뤤�ϡ�/opt �۲��Υǥ��������̤�;͵��������ϡ���С������ȡ��뤷����Ʊ�����פ˥��ȡ��뤹�뤳�Ȥ��ᤷ�ޤ�����С������κ������ˡ�ϡ����������
|
# cd /opt/pgi (���ޤǤ� PGI 2017 �����ȡ��뤵��Ƥ������
# ls
|
|
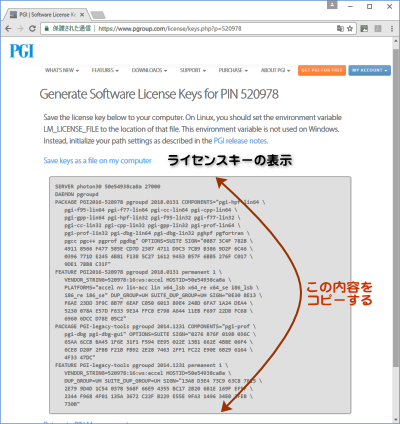
license.dat ��ǰ�Τ���ˡ��̤�̾�����Ѥ������Ƥ�������������ϡ����������Ƥ��� ���ΥС������� �饤���Ǥ�����������
2018 �ѤΥ饤���ϡ�����ƹ� PGI �ҤΥ����Ȥ���������ޤ���
|
# mv license.dat license.dat.backup
|
�� root �Υ�����������ե���������ꤢ�뤤���ѹ�
����(�������ȡ���Ǥϡ����������Ԥ���
�������С�����åפξ��ϴ�¸�ե�������ѹ��� |
|
�������ȡ���ξ��ϡ��ʲ��δĶ��ѿ������ꤷ�Ƥ���������
�С�����åפξ��ϡ�root �桼���Υ�����������ե������/root/.cshrc���ˤ����Ǥ�¸�ߤ��Ƥ���Τǡ��ʲ��Τ褦�˳Ƽ�ѥ������������ѹ����ޤ������� ��linux86-64/2018/�� �� 2018 ����ʬ�ϥ��եȥ������Υ�㡼�����ֹ��ɽ���ޤ��� �ѹ�������ʬ�ϰʲ�����������ʬ�Ǥ���¨�������� 2017 �ȤʤäƤ����Τ� 2018 ���ѹ����Ƥ����������⤷�����Υե�������˰ʲ��ε��Ҥ��ʤ���С����������Ƥ��ɲä��Ƥ����������ʲ�����ϡ�64bit Linux �Ѥ�����Ǥ���
�ޤ���PGI 2018 �ȡ��뤹��ǥ��쥯�ȥ꤬��/opt/pgi �ξ��ϡ��ʲ��δĶ��ѿ� "PGI" ��/opt/pgi �Ȥ��Ƥ���������
|
��64bit �Ķ��ξ���
csh�ޤ��ϡ�tcsh�ξ�硢/root/.cshrc���˰ʲ��Τ褦�ʵ��Ҥ�ä��Ʋ�������
��setenv PGI /opt/pgi (����ѥ���� installation directory�����)
��set path = ( $PGI/linux86-64/2018/bin $path )
��setenv MANPATH "$MANPATH":$PGI/linux86-64/2018/man
��setenv LM_LICENSE_FILE $PGI/license.dat
sh�ޤ��ϡ�bash�ξ�硢/root/.bashrc���˰ʲ��Τ褦�ʵ��Ҥ�ä��Ʋ�������
�����ƥ�����Ԥ����桼����ȿ�ǤǤ���褦�� /etc/bash.bashrc �ե����롢
���뤤�� /etc/profile.local ���˰ʲ��δĶ��ѿ������ꤷ�Ƥ�����⤢��ޤ���
��export PGI=/opt/pgi (����ѥ���� installation directory�����)
��export PATH=$PGI/linux86-64/2018/bin:$PATH
��export MANPATH=$MANPATH:$PGI/linux86-64/2018/man
��export LM_LICENSE_FILE=$PGI/license.dat
|
|
�嵭���ѹ���ä����塢 source .bashrc ���Ǹ��ߤδĶ��ѿ������ͤ� flash ���Ƥ������������뤤�ϡ����������Ȥθ塢���٥������Ƥ���������
|
| �� Linux���ɬ�ܥѥå�������Ƴ�� |
|
(����) PGI 12.1 �ʹߤǤϡ�Linux ��� Linux Standard Base(LSB) package ��������ɬ���Ǥ���PGI ���եȥ������Υ��ȡ������ˡ�ɬ������ǧ������������˴ؤ��Ƥ� FAQ �Ȥ��ơ�Ubuntu��Ϣ��SUSE ��Ϣ��RedHat��Ϣ ���Ѱդ��Ƥ���ޤ���
|
|
 ���̥ȥåפ� ���̥ȥåפ�
|
|
STEP 3 : ���С������Υ��ȡ���
|
| �� ����������ɤ����ե������Ÿ�� |
|
���ȡ���ϡ� root �����Ǽ¹Ԥ��Ƥ�������������������ɤ���pgilinux-2018-17*-x86_64.tar.gz (64bit��) �ե������ /tmp �۲��ˤ����ޤ��� /tmp/pgi �۲��˥ƥ�ݥ��� pgi �Υե������Ÿ�����ޤ���1.0 GB �ʾ�Υ�������Ÿ������ޤ��Τ���ɬ����/tmp ���ꥢ���Ÿ�����Ƥ�����������
|
|
PGI 2017 �������� 64bit �ǤΥ��եȥ������Τߤ����Ȥʤ�ޤ�����
(64bit �ǥ��եȥ�����)
% tar zxvf pgilinux-2018-17*-x86-64.tar.gz
|
�ʰʲ���64bit�ǥ��եȥ������ξ��Υ��ޥ�����
# cd /tmp
# ftp .... to get pgilinux-2018-18x-x86-64.tar.gz file��
# mkdir pgi
# cd pgi
# tar zxvf ../pgilinux-2018-18x-x86-64.tar.gz
(Ÿ������ޤ���
|
| �� ���ȡ�����Υ�����θ���⡼�ɤγ�ǧ���ʽ��ס� |
|
PGI ����ѥ���Υ��ȡ���ϡ��Ķ��ѿ� LANG ���Ѹ�⡼�ɤδĶ��ǹԤ�ɬ��������ޤ��� 'env' ���ޥ�����ǡ����ߤδĶ��ѿ� LANG ���ͤ��ǧ���Ƥ����������⤷�����ܸ�⡼�ɤξ��ϡ��ʲ��Τ褦�� root
�桼����ǡ��Ķ��ѿ� LANG ��Ѹ�⡼�ɤ����ꤷ�Ƥ����������ʤ����Ķ��ѿ� LANG �ϡ����ꤷ��������Τ�ͭ���Ǥ��Τǡ�Ʊ��������ˤ�
PGI ����ѥ���Υ��ȡ����install ���ޥ�ɤμ¹ԡˤ�ԤʤäƲ��������������������Ԥ鷺���ȡ��뤷����硢����ѥ����ư��ޤ�����
|
sh��bash ��
# export LANG=C�ʤޤ��ϡ�export LANG=en_US)
Ubuntu Linux �ξ��ϡ��ʲ����ѿ��⥻�åȤ��Ƥ���������
# export LC_ALL=C
csh��tcsh ��
# setenv LANG C�ʤޤ��ϡ�setenv LANG en_US��
Ubuntu Linux �ξ��ϡ��ʲ����ѿ��⥻�åȤ��Ƥ���������
# setenv LC_ALL C
|
| �� ���ȡ��롦������ץȤμ¹� |
|
Ÿ�����줿�۲��ˡ�" install "�ȸ���������ץȡ��ե����뤬¸�ߤ��ޤ��������¹Ԥ��ơ�PGI 2018 �ȡ����¹Ԥ��ޤ���
|
# ./install
|
|
�饤�������˴ؤ��������Ф��ƾ���(Accept)�����塢�ʲ��Τ褦�ʡ֥��ȡ����ˡ�פ˴ؤ����䤤������ޤ��Τǡ�����ϡ��� �� ��Single system install�� �����Ӥ���������
���ˡ�PGI����ѥ�����������롼�ȡ��ǥ��쥯�ȥ�γ�ǧ��å�������ɽ������ޤ��Τǡ��ѹ����ʤ���Ф��Τޤ�Enter�������ޤ���������ɽ�������ǥե���ȡ��ǥ��쥯�ȥ�ϡ�/opt/pgi�פǤ����⤷�����ǥ��ȡ��롦�ǥ��쥯�ȥ���ѹ����������ϥǥ��쥯�ȥ�̾��ե�ѥ������Ϥ���enter�������Ʋ�������
|
A network installation will save disk space by having only onecopy of the compilers and most of the
libraries for all systems on the network, and the main installation needs to be done once
for all systems on the network.
1. Single system install
2. Network install
Please choose install option(1-2):
1 <enter> �� (1�����Ϥ���enter�������ޤ�)
Please specify the directory path under which the software will be
installed. The default directory is /opt/pgi, but you may
install anywhere you wish, assuming you have permission to do so.
Installation directory? [/opt/pgi]
|
| ���ˡ�NVIDIA�Ҥ�CUDA ���եȥ�������NVIDIA�Ҥλ��ѵ���������̤˸���ޤ������ѵ����� accept���Ƥ��������� |
**********************************************************
CUDA Toolkit
**********************************************************
This release contains a subset of NVIDIA's CUDA 8.0, CUDA 9.0, and CUDA 9.1
toolkits configured for use by the PGI OpenACC and CUDA Fortran
compilers and required by the PGI profiler.
(��ά)
Press enter to continue...
In order to install the CUDA software, please read and accept the following license.
End User License Agreement
(��ά)
Do you accept these terms? (accept,decline)��accept
�� (���Ƥ�Ʊ�դξ�硢accept�����Ϥ���enter�������ޤ�)
|
| ���ˡ�JAVA JRA�����ѵ�����Ԥ��ޤ��� |
***********************************************************
JRE
***********************************************************
This release of PGI software includes the JAVA JRE. PGI's graphical
debugger and profiler use components from this package.
Press enter to continue...
Oracle�Ҥλ��ѵ���������̤˸���ޤ����ʾ�ά��
For inquiries please contact: Oracle America, Inc., 500 Oracle
Parkway, Redwood Shores, California 94065, USA.
Last updated 02 April 2013
Do you accept these terms? (accept,decline) accept
�� (���Ƥ�Ʊ�դξ�硢accept�����Ϥ���enter�������ޤ�)
|
|
OpenACC Unified Memory Evaluation�����ѵ�����Ԥ��ޤ���
|
***********************************************************
OpenACC Unified Memory Evaluation Package
***********************************************************
This release contains the PGI OpenACC Unified Memory Evaluation package
which enables limited use of CUDA Unified Memory from within OpenACC.
Press enter to continue...
(��ά)
Rev 2018-Jan
Do you accept these terms? (accept,decline) accept
�� (���Ƥ�Ʊ�դξ�硢accept�����Ϥ���enter�������ޤ�)
|
PGI ����ѥ����������ʬ���ʲ��Υ�å������ȤȤ�ˡ����ȡ��뤬�Ϥޤ�ޤ������Ф餯���֤�ɬ�פǤ�������ѥ��餬����˥��ȡ��뤵���ȡ��ʲ��Τ褦�� "Making symbolic links ***" �ȸ�����å���������Ͽ����ޤ���32bit Linux �ξ��ϡ�"Making symbolic links in /opt/pgi/linux86/2018" �ȸ�����Ͽ�Ȥʤ�ޤ����ʤ������Υ�å����������ˡ�"Error �ɤΥ�å��������ФƤ�����ϡ��֥��ȡ��뤬���Ԥ��Ƥ��ޤ��פΤǡ�Ŭ�Ѥ��Ƥ��롡Linux �γ�ǧ�ꤤ�������ޤ���
|
Installing software into /opt/pgi (this may take some time).
#################################################
�����ȡ��롦���顼��������ϡ������˥��顼��å�������ɽ���������
If you use the 2018 directory in your path, you may choose to
update the links in that directory to point to the 18.x directory.
Do you wish to update/create links in the 2018 directory? (y/n) y (y�Ȥ���)
����ɽ�ǥ��쥯�ȥ�κ�����Ԥ��ޤ���y�Ȥ��Ƥ���������
Making symbolic links in /opt/pgi/linux86-64/2018
Making symbolic links in /opt/pgi/linux86-64-llvm/2018
�����ѥå���������������ޤ���
nstalling PGI JAVA components into /opt/pgi/linux86-64/2018
Installing PGI JAVA components into /opt/pgi/linux86-64-llvm/2018
Installing examples into /opt/pgi/linux86-64/2018
Installing examples into /opt/pgi/linux86-64-llvm/2018
Installing PGI CUDA components into /opt/pgi/linux86-64/2018
####################### (100%)
Installing PGI CUDA components into /opt/pgi/linux86-64-llvm/2018
####################### (100%)
|
���ˡ�Open MPI �饤�֥��Υ��ȡ����Ԥ��ޤ�����enter�ɤ���³���Ʋ�������
���θ塢���եȥ����������Ƥμ����������ޤ�
PGI ����ѥ���ȤȤ�˥��ȡ��뤵�줿 Open MPI ����ˡ�˴ؤ��Ƥϡ�������Υڡ������������Ƥ���ޤ���
|
**********************************************************
MPI
**********************************************************
This release contains version 2.1.2 of the Open MPI library.
Press enter to continue...
Do you want to install Open MPI onto your system? (y/n) y (���ȡ��뤹���� y)
Do you want to enable NVIDIA GPU support in Open MPI? (y/n) n (Open MPI �� CUDA-aware ��ǽ����Ѥ����� y)
�� �嵭���䤤�� NVIDIA GPUdirect ��ǽ����Ѥ�������� y �Ȥ��뤬������Ū�ˤ� n �Ȥ��ƻȤ�ʤ���������
Installing package openmpi-2.1.2-2018-x86-64
(ά)
Installing package openmpi-2.1.2-2018-x86-64-llvm
(ά)
Installing module files for PGI version(s): 16.10 16.9 17.1 2017 2018
Done
|
����ˤơ�PGI���եȥ������μ������ȡ���Ͻ�λ���ޤ���
���ˡ��饤�������μ����˴ؤ��ơ��ʲ������䤬���̤˸���ޤ��� |
NOTICE: A STARTER 18.1 license key is available at:
/opt/pgi/license.dat-STARTER-18.1
Copy to /opt/pgi/license.dat to use by default,
or point to it with PGROUPD_LICENSE_FILE or LM_LICENSE_FILE.
������
Do you wish to obtain permanent license key or configure license service? (y/n)��n
��ǡ���ư�ǥ饤�������ե���������ꤹ�뤿�ᡢn ������
(����
Do you want the files in the install directory to be read-only? [y,n]
n
|
|
����ǡ�2018 �С������Υ��ȡ��뤬��λ���ޤ����饤����������������̤λ�Ǥ��Τǡ����� STEP4 �ˤ��ʤ߲�������
���ȡ��뤬��λ�����顡����������ɤ����ե�����ȥƥ�ݥ��� directory ��õ����Ƥ���������
|
# rm -rf /tmp/pgi
|
|
���̥ȥåפ�
|
���̥ȥåפ�
STEP 5 : FlexNet �饤���ޥ͡������ƥ��åȡ���ư
PGI 2018 �� FlexNet �饤�������ε�ư������ץȡ�lmgrd.rc�ˤ��ƥ���/etc �۲��ˤ���Ͽ���ޤ���
�ޥ���κƵ�ư��ˡ���ưŪ�� FlexNet �ޥ͡������Ω���夲�뤿���ɬ�פʥե�����Ǥ������κ�Ȥ���λ�塢���ߤΥ��å����ǡ�FlexNet �饤�������ޥ͡�������ư��ư���ޤ���
PGI 18.x �˥С�����åפ��뤪���ͤ�
PGI 18.1 �ʹߡ�FlexNet license manager ���եȥ��������ȼ����������� lmgrd ���եȥ������˹�������ޤ�����PGI
18.1 �ʹߤ˥С�����åפ���ݡ����� lmgrd ���եȥ���������Ѥ��뤿��ˡ�������$PGI/linux86-64/2018/bin/lmgrd.rc����Ѥ���(/etc/init.d/lmgrd-pgi
�Ȥ��ƥ��ԡ�����)���饤�����ǡ����ε�ư�ꤤ�������ޤ���
|
| �饤�������Ф�ư�������γ�ǧ���� |
|
Linux �Υ����ƥ��ǰʲ��Τ��Ȥ��ǧ���Ʋ�������
������license.dat �� 1 ���ܤ� SERVER �Ԥ˵����줿�֥ۥ���̾�פ���/etc/hosts �����Ͽ����Ƥ��뤫��
���������Ρ֥ۥ���̾�פ� IP address ����ifconfig ���ޥ�ɤǽ��Ϥ���� eth0 �ݡ��Ȥ� IP ���ɥ쥹��Ʊ������
������Linux�����ƥ�Υͥåȥ�������ե�����������̾�� eth0, eth1, eth2, ..., ethX �Ǥ��뤳�Ȥ��ǧ���롣
�������ʻ��͡�
������Ubuntu 15.10 �ʹߤ� eth0 �ݡ��Ȥ��ʤ������н�
������Fedora 16, Red Hat 7�ʹߤ� eth0 �ݡ��Ȥ��ʤ����Ȥˤ�롡license.dat ������Ǥ��ʤ�����
�����������ۥ��Ȥ����� IP ���ɥ쥹������ʤ� DHCP �ˤ������ξ��ϡ��ۥ���̾�� localhost �Ȥ��뤫��
�������⤷���ϡ�������� FAQ �ͤΤ��ȡ�
|
| �� FlexNet ��ư������ץȡ�lmgrd.rc�ˤ��ƥ����Ͽ���� |
|
|
�������ȡ���λ������ǤϤʤ����С�����åפξ��Ǥ��äƤ⡢�ʲ��Υ��ޥ�ɤμ¹Ԥ�ԤäƤ�������������ϡ������ƥ�κƵ�ư���ˡ���ưŪ�ˡ�FlexNet�ޥ͡������Ω���夲�뤿��Υ�����ץȤ���Ͽ�����ΤǤ����ʲ�����ϡ����ߤޤ�ư��Ƥ���
2018 (18.x) �Ѥ� /etc/init.d �۲��� lmgrd-pgi �����Ƥ�־�פ��������ԤäƤ��ޤ����ʤ������ξ�硢�����ƥ൯ư���˼�ưŪ��Ω���夲�����٥������ϡ����Ǥ˰����ΥС������Ǥʤ���Ƥ��뤳�Ȥ��ꤷ�Ƥ��ޤ����ʤ����ʲ��˼�����
"lmgrd-pgi" �ȸ����ե�����̾�ϡ�Ǥ�դ�̾���Ƿ빽�Ǥ���
�����ա� ɬ����PGI 2018 �˥Х�ɥ뤵�줿 lmgrd.rc �ե������/etc/init.d/ �۲� �� lmgrd-pgi �Ȥ�����Ͽ���Ƥ�����������С�������Ѥ�lmgrd-pgi
��¸�ߤ���ʤ�С־�פ��Ʋ��������ȼ������н褷���ǿ��� lmgrd ���եȥ����������Ѥ���ޤ��ˡ�
|
��64�ӥåȤξ���
# cp $PGI/linux86-64/2018/bin/lmgrd.rc /etc/init.d/lmgrd-pgi
ǰ�Τ��ᡢ���ߤΥ����ƥ൯ư�������ꤵ��Ƥ������٥���ǧ����
�ʲ��� chkconfig ���ޥ�ɤǡ�3, 5 �� on �ȤʤäƤ���Ϥ��Ǥ�
��# chkconfig --list | grep lmgrd-pgi
lmgrd-pgi 0:off 1:off 2:off 3:on 4:off 5:on 6:off
�⤷��3, 5 �� on �ˤʤäƤ��ʤ����ϡ��ʲ��Υ��ޥ�ɤ�¹Ԥ��Ƥ�������
# chkconfig --add lmgrd-pgi
----------------------------------------------------------------------
Red Hat Enterprise Linux 7 / CentOS 7 �Ϥξ��ϡ������� systemctl ��
�Ԥ��ޤ���
��# systemctl enable lmgrd-pgi.service
��lmgrd-pgi.service is not a native service, redirecting to /sbin/chkconfig.
��Executing /sbin/chkconfig lmgrd-pgi on
���뤤�ϡ��ǥե���ȤǤ� chkconfig ���ޥ�ɤ���������Ƥ��ޤ�����ͥåȥ��
���ޥ�ɤ⥤�ȡ��뤷�Ƥ�����ϡ��ʲ��Υ��ޥ�ɤǤ���Ͽ�Ǥ��ޤ���
��# chkconfig lmgrd-pgi on
��# chkconfig --list
��lmgrd-pgi 0:off 1:off 2:on 3:on 4:on 5:on 6:off
-----------------------------------------------------------------------
Ubuntu Linux �ξ��ϡ�chkconfig ���ޥ�ɤ��ʤ����ᡢ
sysv-rc-conf���ޥ�ɤ���Ѥ��ޤ���
# cd /etc/init.d
$ sysv-rc-conf lmgrd-pgi on
# sysv-rc-conf --list | grep lmgrd-pgi
lmgrd-pgi 1:off 2:off 3:on 4:off 5:on
|
| ����FlexNet �饤���ޥ͡�������ư��ư���� |
|
���ˡ����ߤΥ��å����ǡ��ܺ�Ȥκǽ����ߤ��� FlexNet �ޥ͡�����μ�ư�Ƶ�ư��Ԥ��ޤ���OS �ˤ�ꡢ�ʲ��Τɤ��餫�ǵ�ư���Ƥ�������������ǡ����ƤΥ��ȡ����Ȥν�λ�Ǥ����ʤ����饤���ޥ͡�����˴ؤ��ܺ٤ˤĤ��Ƥϡ������ޤ����֥��ȡ���μ�����פ��碌�Ƥ�������������
�ޤ����ǡ��������˵�ư�������γ�ǧ��ˡ�ϡ�ps ���ޥ�ɤ� lmgrd �ץ�����, pgroupd �ץ�������¸����ǧ����������
|
# /etc/init.d/lmgrd-pgi start
----------------------------
Ubuntu Linux �ξ��ϡ��ʲ��Υ�å��������Фޤ���
WARNING: /usr/tmp must exist for FlexNet license daemons to work.
Either create the directory /usr/tmp or make /usr/tmp a
symlink to /tmp.
/usr/tmp ��ɬ�פȤʤ뤿��Ǥ���������� /tmp �˥���ܥ�å�����ޤ���
# cd /usr
# ln -s /tmp tmp
# ls -l
lrwxrwxrwx 1 root root 4 1�� 5 17:21 tmp -> /tmp
|
|
����FlexNet �饤���ޥ͡�����ε�ư�˷���ȥ�֥��Ͽ���������ե�����˴ؤ��Ƥϡ��������FAQ���Ȥ���������
|